


浏览 7.5k
WordPress 的安装方法数不胜数,在撰写本文之时,Google 搜索“WordPress 安装”的条目多达 488,000 条。虽然如此,但能够全面解释如何以支持长期维护的方式安装 WordPress 和底层操作系统的教程却寥寥无几。原因可能是正确的配置很大程度上取决于具体的需求,也可能是全面的安装教程无法通过简单几句话解释清楚。
在这篇文章中,我们将试着就此给出解决办法。我们提供了在 Ubuntu 上自动执行
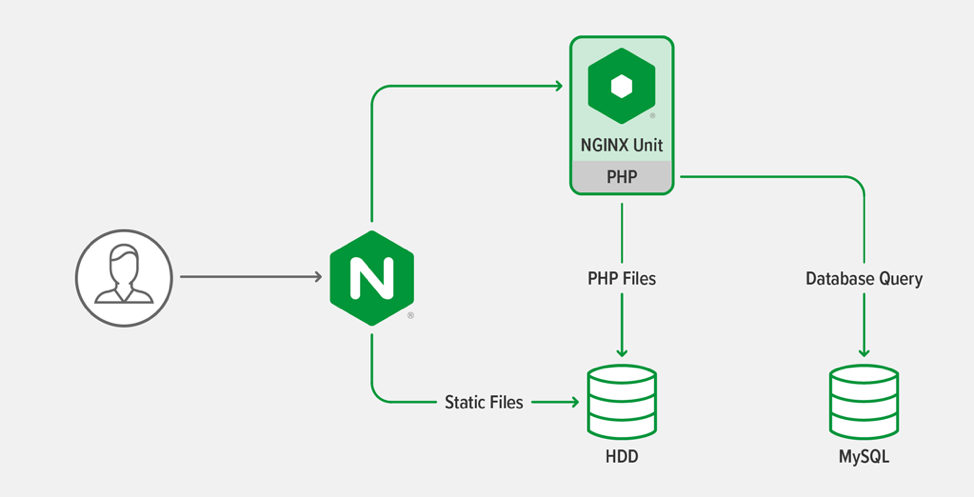
我们延续了上一篇博客中介绍的通过 NGINX Unit 部署 WordPress 的基本架构,另外还安装和配置了上一篇博客(或许多其他教程)中没有涵盖的特性:
·
·
·
·
·
·
·
本篇文章描述了在同时部署了静态资源 Web 服务器、PHP 处理服务器和数据库的单个节点上设置 WordPress 的方法。未来,我们还将介绍多主机、多服务的 WordPress 配置安装。您还希望我们讨论什么主题?请在文末评论区告诉我们!
前提条件
·
·
·
·
架构概述
应用架构为三层 Web 应用,与上一篇博客中描述的应用架构相同。其中包括必须由 PHP 处理器执行的 PHP 脚本和必须由 Web 服务器传递的静态文件。
一般原则
·
·
·
·
·
·
设置环境变量
请在运行脚本之前设置以下环境变量。
WORDPRESS_DB_PASSWORD–WordPress 数据库的密码。
WORDPRESS_ADMIN_USER– WordPress 管理员的用户名。
WORDPRESS_ADMIN_PASSWORD – WordPress 管理员的密码。
WORDPRESS_ADMIN_EMAIL– WordPress 管理员的电子邮件地址。
WORDPRESS_URL– WordPress 网站的完整 URL,以 https://开头。
LETS_ENCRYPT_STAGING–默认为空,但如果使用 Lets Encrypt 暂存服务器,则设为 1,频繁测试新的部署配置时必需进行此操作。否则,Let’s Encrypt 可能会因请求数量过多而暂时拦截您的 IP 地址。
脚本将检查是否已设置与 WordPress 相关的变量,如果未设置,则退出(第 8–42 行,此处未显示)。第
设置派生环境变量
脚本(第 55-61 行,此处未显示)将以下环境变量设置为硬编码值或上一节中设置的变量派生值。
DEBIAN_FRONTEND="noninteractive" – 向应用指示自动化脚本正在执行命令并且无法进行用户交互。
WORDPRESS_CLI_VERSION="2.4.0" – WordPress CLI 的下载版本。
WORDPRESS_CLI_MD5= "dedd5a662b80cda66e9e25d44c23b25c" – WordPress CLI 2.4.0 二进制文件(WORDPRESS_CLI_VERSION 变量指定的版本)的加密校验和。第 162 行使用该值验证下载的 WordPress CLI 版本是否正确。[H4]
UPLOAD_MAX_FILESIZE="16M" – WordPress 支持上传的最大文件大小。此变量在配置中的多个位置使用,可以对其进行集中定义。
TLS_HOSTNAME= "$(echo ${WORDPRESS_URL} | cut -d'/' -f3)" – 从 WORDPRESS_URL 变量中提取的系统可寻址主机名。用于从 Lets Encrypt 获取适当的 TLS/SSL 证书,以及 WordPress 自身的 ping 操作(请参见将 WordPress 网站主机名添加到 /etc/hosts)。
NGINX_CONF_DIR="/etc/NGINX" – 包含 NGINX 配置和主配置文件 NGINX.conf的目录路径。
CERT_DIR="/etc/letsencrypt/live/${TLS_HOSTNAME}" – WordPress 网站主机名(派生自 TLS_HOSTNAME 变量)Let’s Encrypt 证书的路径。
将 WordPress 网站主机名分配给计算实例
脚本将计算实例的主机名设置为与 WordPress 网站的域名相匹配。并非所有配置都需要进行此设置,但在单主机设置(如脚本配置的设置)中通过 SMTP 发送出站电子邮件时此设置将非常有帮助。
63 # Change the hostname to be the same as the WordPress hostname
64 if
[ ! "$(hostname)" == "${TLS_HOSTNAME}" ]; then
65
echo "▶ Changing
hostname to ${TLS_HOSTNAME}"
66
hostnamectl set-hostname "${TLS_HOSTNAME}"
67 fi
将 WordPress 网站主机名添加到 /etc/hosts
WordPress
使用
69 # Add the hostname to /etc/hosts
70 if [
"$(grep -m1 "${TLS_HOSTNAME}" /etc/hosts)" = ""
]; then
71
echo "▶ Adding hostname ${TLS_HOSTNAME} to /etc/hosts so that
WordPress can ping itself"
72
printf "::1 %s\n127.0.0.1 %s\n" "${TLS_HOSTNAME}"
"${TLS_HOSTNAME}" >> /etc/hosts
73 fi
后续步骤所需的安装工具
后面的脚本部分将使用某些实用程序,并假定软件仓库索引已更新。我们更新软件仓库索引(第 77 行)并即刻安装所需工具(第 78-84 行)。
75 # Make sure
tools needed for install are present
76 echo "▶ Installing prerequisite
tools"
77 apt-get -qq update
78 apt-get -qq install -y \
79
bc \
80
ca-certificates \
81
coreutils \
82
curl \
83
gnupg2 \
84
lsb-release
添加[H5] NGINX Unit 和 NGINX 开源库
脚本通过 NGINX 官方仓库安装 NGINX Unit 和 NGINX 开源库,以确保我们始终拥有最新的安全更新和补丁修复程序。
此处,脚本通过为系统添加签名密钥并为 apt 配置(定义 Internet 上的存储库位置)添加文件来安装 NGINX Unit 库(第 87–91 行)和 NGINX 开源库(第 94–98 行)。
NGINX Unit 和 NGINX 开源库实际在下一部分才开始安装。为避免多次更新元数据,我们预先添加了仓库,加快了整体安装速度。[H6]
86 # Install NGINX Unit repository
87 if [ ! -f
/etc/apt/sources.list.d/unit.list ]; then
88
echo "▶ Installing NGINX Unit repository"
89
curl -fsSL https://nginx.org/keys/nginx_signing.key | apt-key add -
90
echo "deb https://packages.nginx.org/unit/ubuntu/ $(lsb_release
-cs) unit" > /etc/apt/sources.list.d/unit.list
91 fi
92
93 # Install NGINX repository
94 if [ ! -f
/etc/apt/sources.list.d/nginx.list ]; then
95
echo "▶ Installing NGINX repository"
96
curl -fsSL https://nginx.org/keys/nginx_signing.key | apt-key add -
97
echo "deb https://nginx.org/packages/mainline/ubuntu $(lsb_release
-cs) nginx" > /etc/apt/sources.list.d/nginx.list
98 fi
安装 NGINX、NGINX Unit、PHP MariaDB、Certbot (Let’s Encrypt) 和依赖项 (Dependencies)
安装完所有仓库后,我们将更新仓库元数据并安装应用。脚本安装的软件包包括运行
WordPress 时推荐的
100 echo "▶ Updating repository metadata"
101 apt-get -qq update
102
111 # Install
PHP with dependencies and NGINX Unit
112 echo "▶ Installing PHP,
NGINX Unit[H7] , NGINX, Certbot, and MariaDB"
113 apt-get -qq install -y --no-install-recommends \
114 certbot \
115 python3-certbot-NGINX \
116 php-cli \
117 php-common \
118 php-bcmath \
119 php-curl \
120 php-gd \
121 php-imagick \
122 php-mbstring \
123 php-mysql \
124 php-opcache \
125 php-xml \
126 php-zip \
127 ghostscript \
128 NGINX \
129 unit \
130 unit-php \
131 mariadb-server
为 NGINX Unit 和 WordPress 配置 PHP
脚本在 PHP conf.d 目录(第 136-174 行)中创建一个配置文件。该文件设置了 PHP 上传文件的最大大小(第 142 行),将 PHP 错误定向到 STDERR(第 145 行),以便将它们记录在 NGINX Unit 日志中,及重启 NGINX Unit(第 151 行)。
133 # Find the major and minor PHP version so that we can write to its conf.d directory
134 PHP_MAJOR_MINOR_VERSION="$(php -v | head -n1 |
cut -d' ' -f2 | cut -d'.'-f1,2)"
135
136 if [ ! -f
"/etc/php/${PHP_MAJOR_MINOR_VERSION}/embed/conf.d/30-wordpress-overrides.ini"
]; then
137 echo "▶
Configuring PHP for use with NGINX Unit and WordPress"
138 # Add PHP configuration overrides
139 cat >
"/etc/php/${PHP_MAJOR_MINOR_VERSION}/embed/conf.d/30-wordpress-overrides.ini"
<< EOM
140 ; Set a larger maximum upload size so that WordPress can handle
141 ; bigger media files.
142 upload_max_filesize=${UPLOAD_MAX_FILESIZE}
143 post_max_size=${UPLOAD_MAX_FILESIZE}
144 ; Write error log to STDERR so that error messages show up in the NGINX
Unit log
145 error_log=/dev/stderr
146 EOM
147 fi
148
149 # Restart NGINX Unit because we have reconfigured PHP
150 echo "▶ Restarting NGINX Unit"
151 service unit restart
初始化 WordPress MariaDB 数据库
我们选择使用 MariaDB 而不是 MySQL 作为 WordPress 数据库。MariaDB 背后有一个更活跃的开源社区,可以说它能够提供更出色的开箱即用性能。
脚本初始化新数据库,并为 WordPress 创建凭证,以通过本地回环地址进行访问。
153 # Set up WordPress database
154 echo "▶ Configuring MariaDB for
WordPress"
155 mysqladmin create wordpress || echo "Ignoring above error because
database may already exist"
156 mysql -e "GRANT ALL PRIVILEGES ON wordpress.*TO
\"wordpress\"@\"localhost\" IDENTIFIED BY
\"$WORDPRESS_DB_PASSWORD\"; FLUSH PRIVILEGES;"
安装 WordPress CLI 实用程序
现在,脚本将安装
158 if [ ! -f /usr/local/bin/wp ]; then
159 # Install the WordPress CLI
160 echo "▶ Installing the WordPress
CLI tool"
161 curl --retry 6 -Ls
"https://github.com/wp-cli/wp-cli/releases/download/v${WORDPRESS_CLI_VERSION}/wp-cli-${WORDPRESS_CLI_VERSION}.phar"
> /usr/local/bin/wp
162 echo "$WORDPRESS_CLI_MD5
/usr/local/bin/wp" | md5sum -c -
163 chmod +x /usr/local/bin/wp
164 fi
安装和配置 WordPress
脚本将最新版本的 WordPress 安装在 /var/www/wordpress目录下,并进行以下设置:
·
·
·
·
·
166 if [ ! -d /var/www/wordpress ]; then
167 # Create WordPress directories
168 mkdir -p /var/www/wordpress
169 chown -R www-data:www-data /var/www
170
171 # Download WordPress using the
WordPress CLI
172 echo "▶ Installing WordPress"
173 su -s /bin/sh -c 'wp --path=/var/www/wordpress
core download' www-data
174
175 WP_CONFIG_CREATE_CMD="wp
--path=/var/www/wordpress config create --extra-php --dbname=wordpress
--dbuser=wordpress --dbhost=\"localhost:/var/run/mysqld/mysqld.sock\"
--dbpass=\"${WORDPRESS_DB_PASSWORD}\""
176
177 # This snippet is injected into the
wp-config.php file when it is created.
178 # It informs WordPress that we are
behind a reverse proxy and as such
179 # allow it to generate links using
https.
180 cat > /tmp/wp_forwarded_for.php
<< 'EOM'
181 /* Turn HTTPS 'on' if HTTP_X_FORWARDED_PROTO matches 'https' */
182 if (isset($_SERVER['HTTP_X_FORWARDED_PROTO']) &&
strpos($_SERVER['HTTP_X_FORWARDED_PROTO'], 'https') !== false) {
183 $_SERVER['HTTPS'] = 'on';
184 }
185
186 if (isset($_SERVER['HTTP_X_FORWARDED_HOST'])) {
187 $_SERVER['HTTP_HOST'] =
$_SERVER['HTTP_X_FORWARDED_HOST'];
188 }
189 EOM
190
191 # Create WordPress configuration
192 su -s /bin/sh -p -c "cat
/tmp/wp_forwarded_for.php | ${WP_CONFIG_CREATE_CMD}" www-data
193 rm /tmp/wp_forwarded_for.php
194 su -s /bin/sh -p -c "wp
--path=/var/www/wordpress config set 'FORCE_SSL_ADMIN' 'true'" www-data
195
196 # Install WordPress
197 WP_SITE_INSTALL_CMD="wp
--path=/var/www/wordpress core install --url=\"${WORDPRESS_URL}\"
--title=\"${WORDPRESS_SITE_TITLE}\"
--admin_user=\"${WORDPRESS_ADMIN_USER}\"
--admin_password=\"${WORDPRESS_ADMIN_PASSWORD}\"
--admin_email=\"${WORDPRESS_ADMIN_EMAIL}\" --skip-email"
198 su -s /bin/sh -p -c
"${WP_SITE_INSTALL_CMD}" www-data
199
200 # Set permalink structure to a
sensible default that isn't in the UI
201 su -s /bin/sh -p -c "wp
--path=/var/www/wordpress option update permalink_structure
'/%year%/%monthnum%/%postname%/'" www-data
202
203 # Remove sample file because it is
cruft and could be a security problem
204 rm
/var/www/wordpress/wp-config-sample.php
205
206 # Ensure that WordPress permissions
are correct
207 find /var/www/wordpress -type d
-exec chmod g+s {} \;
208 chmod g+w
/var/www/wordpress/wp-content
209 chmod -R g+w /var/www/wordpress/wp-content/themes
210 chmod -R g+w
/var/www/wordpress/wp-content/plugins
211 fi
配置 NGINX Unit
脚本将配置 NGINX Unit以运行 PHP 、处理 WordPress 路径、隔离 PHP 进程命名空间,并优化性能设置。以下三个特性需要注意:
1.
2.
3.
此值可确保始终至少有两个 PHP 进程在运行,这一点很重要,因为 WordPress 自身会进行多次异步调用,并且如果没有其他进程运行,WP-Cron 等操作将会失败。由于此处生成的设置是保守设置,因此您可能需要根据特定的 WordPress 配置增减此设置。许多生产系统设置通常在 10 到 100 之间。
213 if [ "${container:-unknown}" !=
"lxc" ] && [ "$(grep -m1 -a container=lxc
/proc/1/environ | tr -d '\0')" == "" ]; then
214NAMESPACES='"namespaces": {
215"cgroup": true,
216"credential": true,
217"mount": true,
218"network": false,
219"pid": true,
220"uname": true
221}'
222 else
223NAMESPACES='"namespaces": {}'
224 fi
225
226 PHP_MEM_LIMIT="$(grep 'memory_limit' /etc/php/7.4/embed/php.ini | tr -d ' ' | cut -f2 -d= | numfmt --from=iec)"
227 AVAIL_MEM="$(grep MemAvailable /proc/meminfo | tr -d ' kB' | cut -f2 -d: | numfmt --from-unit=K)"
228 MAX_PHP_PROCESSES="$(echo "${AVAIL_MEM}/${PHP_MEM_LIMIT}+5" | bc)"
229 echo "▶ Calculated the maximum number of PHP processes as ${MAX_PHP_PROCESSES}.You may want to tune this value due to variations in your configuration.It is not unusual to see values between 10-100 in production configurations."
230
231 echo
"▶ Configuring NGINX Unit to use PHP and WordPress"
232 cat > /tmp/wordpress.json << EOM
233 {
234 "settings": {
235 "http": {
236 "header_read_timeout": 30,
237 "body_read_timeout": 30,
238 "send_timeout": 30,
239 "idle_timeout": 180,
240 "max_body_size": $(numfmt --from=iec ${UPLOAD_MAX_FILESIZE})
241 }
242 },
243 "listeners": {
244 "127.0.0.1:8080": {
245 "pass": "routes/wordpress"
246 }
247 },
248 "routes": {
249 "wordpress": [
250 {
251 "match": {
252 "uri": [
253"*.php",
254 "*.php/*",
255"/wp-admin/"
255 ]
257 },
258 "action": {
259 "pass": "applications/wordpress/direct"
260 }
261 },
262 {
263 "action": {
264 "share": "/var/www/wordpress",
265 "fallback": {
266"pass": "applications/wordpress/index"
267 }
268 }
269 }
270 ]
271 },
272 "applications": {
273 "wordpress": {
274 "type": "php",
275 "user": "www-data",
276 "group": "www-data",
277 "processes": {
278 "max": ${MAX_PHP_PROCESSES},
279 "spare": 1
280 },
281 "isolation": {
282 ${NAMESPACES}
283 },
284 "targets": {
285 "direct": {
286 "root": "/var/www/wordpress/"
287 },
288 "index": {
289 "root": "/var/www/wordpress/",
290 "script": "index.php"
291 }
292 }
293 }
294 }
295 }
296 EOM
297
298 curl -X PUT --data-binary @/tmp/wordpress.json --unix-socket /run/control.unit.sock http://localhost/config
配置 NGINX
配置核心 NGINX 参数
该脚本为 NGINX 缓存目录创建了一个目录(第 301 行),并创建了 NGINX nginx.conf 主配置文件(第 304–341 行)。配置设置中包括 NGINX 工作进程数(第 306 行)和上传文件的最大体积(第 325 行)。第 329 行导入了下一部分中定义的压缩配置,第 332–337 行设置了缓存参数。
300 # Make directory for NGINX cache
301 mkdir -p /var/cache/nginx/proxy
302
303 echo "▶ Configuring NGINX"
304 cat > ${NGINX_CONF_DIR}/nginx.conf << EOM
305 user NGINX;
306 worker_processesauto;
307
308 error_log/var/log/NGINX/error.log warn;
309 pid/var/run/NGINX.pid;
310
311 events {
312worker_connections1024;
313 }
314
315 http {
316include${NGINX_CONF_DIR}/mime.types;
317default_typeapplication/octet-stream;
318
319log_format main '\$remote_addr - \$remote_user [\$time_local] "\$request" '
320'\$status \$body_bytes_sent "\$http_referer" '
321'"\$http_user_agent" "\$http_x_forwarded_for"';
322
323access_log /var/log/NGINX/access.log main;
324sendfileon;
325client_max_body_size ${UPLOAD_MAX_FILESIZE};
326keepalive_timeout65;
327
328# GZIP settings
329include ${NGINX_CONF_DIR}/gzip_compression.conf;
330
331# Cache settings
332proxy_cache_path /var/cache/NGINX/proxy
333levels=1:2
334keys_zone=wp_cache:10m
335max_size=10g
336inactive=60m
337use_temp_path=off;
338
339include ${NGINX_CONF_DIR}/conf.d/*.conf;
340 }
341 EOM
配置 NGINX 压缩设置
在将内容发送给客户端之前动态压缩内容能够有效提高网站性能,但前提是压缩配置正确无误。脚本使用 GitHub 上h5bp 仓库中的配置(第 346–414 行)。
343 cat > ${NGINX_CONF_DIR}/gzip_compression.conf << 'EOM'
344 # Credit: https://github.com/h5bp/server-configs-NGINX/
345
346 # ----------------------------------------------------------------------
347 # | Compression|
348 # ----------------------------------------------------------------------
349
350 # https://nginx.org/en/docs/http/ngx_http_gzip_module.html
351
352 # Enable gzip compression.
353 # Default: off
354 gzip on;
355
356 # Compression level (1-9).
357 # 5 is a perfect compromise between size and CPU usage, offering about 75%
358 # reduction for most ASCII files (almost identical to level 9).
359 # Default: 1
360 gzip_comp_level 6;
361
362 # Don't compress anything that's already small and unlikely to shrink much if at
363 # all (the default is 20 bytes, which is bad as that usually leads to larger
364 # files after gzipping).
365 # Default: 20
366 gzip_min_length 256;
367
368 # Compress data even for clients that are connecting to us via proxies,
369 # identified by the "Via" header (required for CloudFront).
370 # Default: off
371 gzip_proxied any;
372
373 # Tell proxies to cache both the gzipped and regular version of a resource
374 # whenever the client's Accept-Encoding capabilities header varies;
375 # Avoids the issue where a non-gzip capable client (which is extremely rare
376 # today) would display gibberish if their proxy gave them the gzipped version.
377 # Default: off
378 gzip_vary on;
379
380 # Compress all output labeled with one of the following MIME-types.
381 # `text/html` is always compressed by gzip module.
382 # Default: text/html
383 gzip_types
384application/atom+xml
385application/geo+json
386application/javascript
387application/x-javascript
388application/json
389application/ld+json
390application/manifest+json
391application/rdf+xml
392application/rss+xml
393application/vnd.ms-fontobject
394application/wasm
395application/x-web-app-manifest+json
396application/xhtml+xml
397application/xml
398font/eot
399font/otf
400font/ttf
401image/bmp
402image/svg+xml
403text/cache-manifest
404text/calendar
405text/css
406text/javascript
407text/markdown
408text/plain
409text/xml
410text/vcard
411text/vnd.rim.location.xloc
412text/vtt
413text/x-component
414text/x-cross-domain-policy;
415 EOM
为 WordPress 配置 NGINX 参数
接下来,脚本在
·
·
·
·
·
·
·
·
417 cat > ${NGINX_CONF_DIR}/conf.d/default.conf << EOM
418 upstream unit_php_upstream {
419server 127.0.0.1:8080;
420
421keepalive 32;
422 }
423
424 server {
425listen 80;
426listen [::]:80;
427
428# ACME-challenge used by Certbot for Let's Encrypt
429location ^~ /.well-known/acme-challenge/ {
430root /var/www/certbot;
431}
432
433location / {
434return 301 https://${TLS_HOSTNAME}\$request_uri;
435}
436 }
437
438 server {
439listen 443 ssl http2;
440listen [::]:443 ssl http2;
441server_name ${TLS_HOSTNAME};
442root /var/www/wordpress/;
443
444# Let's Encrypt configuration
445ssl_certificate${CERT_DIR}/fullchain.pem;
446ssl_certificate_key${CERT_DIR}/privkey.pem;
447ssl_trusted_certificate ${CERT_DIR}/chain.pem;
448
449include ${NGINX_CONF_DIR}/options-ssl-NGINX.conf;
450ssl_dhparam ${NGINX_CONF_DIR}/ssl-dhparams.pem;
451
452# OCSP stapling
453ssl_stapling on;
454ssl_stapling_verify on;
455
456# Proxy caching
457proxy_cache wp_cache;
458proxy_cache_valid 200 302 1h;
459proxy_cache_valid 404 1m;
460proxy_cache_revalidate on;
461proxy_cache_background_update on;
462proxy_cache_lock on;
463proxy_cache_use_stale error timeout http_500 http_502 http_503 http_504;
464
465location = /favicon.ico {
466log_not_found off;
467access_log off;
468}
469
470location = /robots.txt {
471allow all;
472log_not_found off;
473access_log off;
474}
475
476# Deny all attempts to access hidden files such as .htaccess, .htpasswd,
477# .DS_Store (Mac).
478# Keep logging the requests to parse later (or to pass to firewall utilities
479# such as fail2ban).
480location ~ /\.{
481deny all;
482}
483
484# Deny access to any files with a .php extension in the uploads directory.
485# Works in sub-directory installs and also in multi-site network;
486# Keep logging the requests to parse later (or to pass to firewall utilities
487# such as fail2ban).
488location ~* /(?:uploads|files)/.*\.php\$ {
489deny all;
490}
491
492# WordPress: deny wp-content, wp-includes php files
493location ~* ^/(?:wp-content|wp-includes)/.*\.php\$ {
494deny all;
495}
496
497# Deny public access to wp-config.php
498location ~* wp-config.php {
499deny all;
500}
501
502# Do not log access for static assets, media
503location ~* \.(?:css(\.map)?|js(\.map)?|jpe?g|png|gif|ico|cur|heic|webp|tiff?|mp3|m4a|aac|ogg|midi?|wav|mp4|mov|webm|mpe?g|avi|ogv|flv|wmv)$ {
504access_log off;
505}
506
507location ~* \.(?:svgz?|ttf|ttc|otf|eot|woff2?)$ {
508add_header Access-Control-Allow-Origin "*";
509access_log off;
510}
511
512location / {
513try_files \$uri @index_php;
514}
515
516location @index_php {
517proxy_socket_keepalive on;
518proxy_http_version 1.1;
519proxy_set_header Connection "";
520proxy_set_header X-Real-IP \$remote_addr;
521proxy_set_header X-Forwarded-For \$proxy_add_x_forwarded_for;
522proxy_set_header X-Forwarded-Proto \$scheme;
523proxy_set_header Host \$host;
524
525proxy_passhttp://unit_php_upstream;
526}
527
528location ~* \.php\$ {
529proxy_socket_keepalive on;
530proxy_http_version 1.1;
531proxy_set_header Connection "";
532proxy_set_header X-Real-IP \$remote_addr;
533proxy_set_header X-Forwarded-For \$proxy_add_x_forwarded_for;
534proxy_set_header X-Forwarded-Proto \$scheme;
535proxy_set_header Host \$host;
536
537try_files\$uri =404;
538proxy_passhttp://unit_php_upstream;
539}
540 }
541 EOM
配置 Certbot 以处理 Let’s Encrypt 证书和自动更新
Certbot是电子前沿基金会 (EFF) 推出的一款免费工具,可从 Let's Encrypt 获取并自动更新 TLS 证书。脚本将执行以下操作,配置 Certbot 为 NGINX 处理Let's Encrypt 证书:
1.
2.
3.
4.
5.
543 echo "▶ Stopping NGINX in order to set up Let's Encrypt"
544 service NGINX stop
545
546 mkdir -p /var/www/certbot
547 chown www-data:www-data /var/www/certbot
548 chmod g+s /var/www/certbot
549
550 if [ ! -f ${NGINX_CONF_DIR}/options-ssl-NGINX.conf ]; then
551 echo "▶ Downloading recommended TLS parameters"
552 curl --retry 6 -Ls -z "Tue, 14 Apr 2020 16:36:07 GMT" \
553 -o "${NGINX_CONF_DIR}/options-ssl-NGINX.conf" \
554 "https://raw.githubusercontent.com/certbot/certbot/master/certbot-nginx/certbot_nginx/_internal/tls_configs/options-ssl-nginx.conf" \
555 || echo "Couldn't download latest options-ssl-NGINX.conf"
556 fi
557
558 if [ ! -f ${NGINX_CONF_DIR}/ssl-dhparams.pem ]; then
559 echo "▶ Downloading recommended TLS DH parameters"
560 curl --retry 6 -Ls -z "Tue, 14 Apr 2020 16:49:18 GMT" \
561 -o "${NGINX_CONF_DIR}/ssl-dhparams.pem" \
562 "https://raw.githubusercontent.com/certbot/certbot/master/certbot/certbot/ssl-dhparams.pem" \
563 || echo "Couldn't download latest ssl-dhparams.pem"
564 fi
565
566 # If tls_certs_init.sh hasn't been run before, let's remove the self-signed certs
567 if [ ! -d "/etc/letsencrypt/accounts" ]; then
568 echo "▶ Removing self-signed certificates"
569 rm -rf "${CERT_DIR}"
570 fi
571
572 if [ "" = "${LETS_ENCRYPT_STAGING:-}" ] || [ "0" = "${LETS_ENCRYPT_STAGING}" ]; then
573 CERTBOT_STAGING_FLAG=""
574 else
575 CERTBOT_STAGING_FLAG="--staging"
576 fi
577
578 if [ ! -f "${CERT_DIR}/fullchain.pem" ]; then
579 echo "▶ Generating certificates with Let's Encrypt"
580 certbot certonly --standalone \
581 -m "${WORDPRESS_ADMIN_EMAIL}" \
582 ${CERTBOT_STAGING_FLAG} \
583 --agree-tos --force-renewal --non-interactive \
584 -d "${TLS_HOSTNAME}"
585 fi
586
587 echo "▶ Starting NGINX in order to use new configuration"
588 service NGINX start
589
590 # Write crontab for periodic Let's Encrypt cert renewal
591 if [ "$(crontab -l | grep -m1 'certbot renew')" == "" ]; then
592 echo "▶ Adding certbot to crontab for automatic Let's Encrypt renewal"
593 (crontab -l 2>/dev/null; echo "24 3 * * * certbot renew --dry-run --NGINX --post-hook 'service NGINX reload'") | crontab -
594 fi
自定义您的 WordPress 网站
以上为您介绍了我们的 bash 脚本如何配置 NGINX 开源版和 NGINX Unit,以托管一个启用 TLS/SSL 的生产环境网站。您可能想要根据自己的需求进一步定制您的网站设置:
·
·
·
·
·
·
为了获得更出色的网站性能,建议您升级到我们基于 NGINX 开源版的企业级商业版产品 NGINX
Plus。NGINX Plus 用户可享受动态加载的Brotli 模块和NGINX ModSecurity WAF(需额外付费)。我们还为您提供了基于 F5 业界领先安全技术的 NGINX
Plus WAF 模块
想要通过 NGINX Plus 试用脚本?立即下载
 创作不易,留下一份鼓励

按点赞数排序
按时间排序


 点赞 1
点赞 1 浏览 1.2k点赞 0浏览 1.3k点赞 1浏览 1.8k
 微信公众号
微信公众号 加入微信群
加入微信群

