


浏览 1.4k
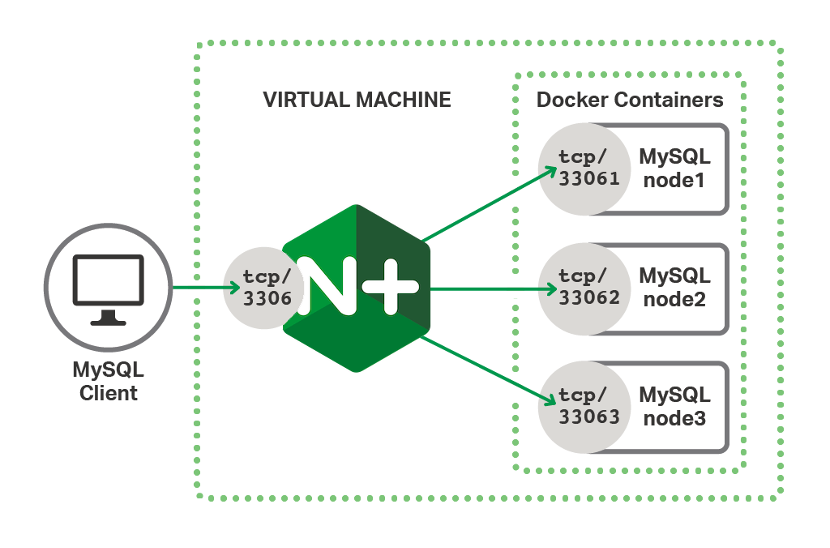
演示环境如上图所示,一台服务器上部署一个NGINX Plus实例,三个MySQL 容器集群,通过NGINX Plus实现MySQL集群的负载。
1 安装NGINX Plus
检查NGINX Plus证书有效性:
[root@centos32 nginx]#
[root@centos32 nginx]# openssl x509 -in nginx-repo.crt -noout -dates
notBefore=Nov 28 07:39:37 2020 GMT
notAfter=May 27 07:39:37 2021 GMT
[root@centos32 nginx]#
[root@centos32 nginx]#
[root@centos32 nginx]#
安装NGINX Plus:
[root@centos32 ~]#
[root@centos32 ~]#
[root@centos32 ~]# systemctl status nginx
Unit nginx.service could not be found.
[root@centos32 ~]#
[root@centos32 ~]#
[root@centos32 nginx]#
[root@centos32 nginx]#
[root@centos32 nginx]# sudo yum install ca-certificates
已加载插件:fastestmirror
Loading mirror speeds from cached hostfile
软件包 ca-certificates-2020.2.41-70.0.el7_8.noarch 已安装并且是最新版本
无须任何处理
[root@centos32 nginx]#
安装NGINX Plus:
[root@centos32 nginx]# cat /etc/system-release
CentOS Linux release 7.9.2009 (Core)
[root@centos32 nginx]# sudo wget -P /etc/yum.repos.d https://cs.nginx.com/static/files/nginx-plus-7.4.repo
--2021-03-17 10:36:59-- https://cs.nginx.com/static/files/nginx-plus-7.4.repo
正在解析主机 cs.nginx.com (cs.nginx.com)… 206.251.255.62
正在连接 cs.nginx.com (cs.nginx.com)|206.251.255.62|:443… 已连接。
已发出 HTTP 请求,正在等待回应… 200 OK
长度:200 [application/octet-stream]
正在保存至: “/etc/yum.repos.d/nginx-plus-7.4.repo.1”
100%[========================================================================================================================] 200 --.-K/s 用时 0s
2021-03-17 10:37:01 (16.2 MB/s) – 已保存 “/etc/yum.repos.d/nginx-plus-7.4.repo.1” [200/200])
[root@centos32 nginx]#
[root@centos32 nginx]#
[root@centos32 ~]#
[root@centos32 ~]#
[root@centos32 ~]# sudo yum install nginx-plus
已加载插件:fastestmirror
Loading mirror speeds from cached hostfile
Thank you for using NGINX!
Please find the documentation for NGINX Plus here:
/usr/share/nginx/html/nginx-modules-reference.pdf
NGINX Plus is proprietary software. EULA and License information:
/usr/share/doc/nginx-plus/
For support information, please see:
https://www.nginx.com/support/
验证中 : nginx-plus-23-1.el7.ngx.x86_64 1/1
已安装:
nginx-plus.x86_64 0:23-1.el7.ngx
完毕!
[root@centos32 ~]# yum list installed | grep nginx
nginx-plus.x86_64 23-1.el7.ngx @nginx-plus
[root@centos32 ~]#
[root@centos32 ~]#
[root@centos32 ~]#
[root@centos32 ~]# systemctl status nginx
● nginx.service – NGINX Plus – high performance web server
Loaded: loaded (/usr/lib/ ystem/system/nginx.service; disabled; vendor preset: disabled)
Active: inactive (dead)
Docs: https://www.nginx.com/resources/
[root@centos32 ~]# systemctl enable nginx
Created symlink from /etc/ ystem/system/multi-user.target.wants/nginx.service to /usr/lib/ ystem/system/nginx.service.
[root@centos32 ~]#
[root@centos32 ~]#
[root@centos32 ~]# systemctl status nginx
● nginx.service – NGINX Plus – high performance web server
Loaded: loaded (/usr/lib/ ystem/system/nginx.service; enabled; vendor preset: disabled)
Active: inactive (dead)
Docs: https://www.nginx.com/resources/
[root@centos32 ~]# systemctl start nginx
[root@centos32 ~]#
[root@centos32 ~]#
[root@centos32 ~]# ps -ef | grep nginx
root 2018 1 0 10:39 ? 00:00:00 nginx: master process /usr/sbin/nginx -c /etc/nginx/nginx.conf
nginx 2019 2018 0 10:39 ? 00:00:00 nginx: worker process
nginx 2020 2018 0 10:39 ? 00:00:00 nginx: worker process
nginx 2021 2018 0 10:39 ? 00:00:00 nginx: worker process
nginx 2022 2018 0 10:39 ? 00:00:00 nginx: worker process
root 2024 1798 0 10:39 pts/0 00:00:00 grep –color=auto nginx
[root@centos32 ~]#
[root@centos32 ~]#
[root@centos32 ~]#
[root@centos32 ~]#
[root@centos32 ~]# curl http://localhost/
<!DOCTYPE html>
<html>
<head>
<title>Welcome to nginx!</title>
<style>
body {
width: 35em;
margin: 0 auto;
font-family: Tahoma, Verdana, Arial, sans-serif;
}
</style>
</head>
<body>
Welcome to nginx!
If you see this page, the nginx web server is successfully installed and
working. Further configuration is required.
For online documentation and support please refer to
<a href=”http://nginx.org/”>nginx.org.<br/>
Commercial support is available at
<a href=”http://nginx.com/”>nginx.com.
<em>Thank you for using nginx.</em>
</body>
</html>
[root@centos32 ~]#2 部署演示用mysql cluster
下载演示用容器镜像:

[root@centos32 ~]#
[root@centos32 ~]# docker pull erkules/galera
Using default tag: latest
latest: Pulling from erkules/galera
bd97b43c27e3: Pull complete
6960dc1aba18: Pull complete
2b61829b0db5: Pull complete
1f88dc826b14: Pull complete
73b3859b1e43: Pull complete
c8885214c070: Pull complete
3061a51b583a: Pull complete
2159a522d712: Pull complete
72235c72038d: Pull complete
ecfa7a3fc85a: Pull complete
Digest: sha256:36ad9baa07be774c16fb72f57d115c726a18206c632f6a82c099d50c4772985b
Status: Downloaded newer image for erkules/galera:latest
docker.io/erkules/galera:latest
[root@centos32 ~]# docker pull erkules/galera:mysql_5.6.35
mysql_5.6.35: Pulling from erkules/galera
Digest: sha256:36ad9baa07be774c16fb72f57d115c726a18206c632f6a82c099d50c4772985b
Status: Downloaded newer image for erkules/galera:mysql_5.6.35
docker.io/erkules/galera:mysql_5.6.35
[root@centos32 ~]#
[root@centos32 ~]#
[root@centos32 ~]# docker images
REPOSITORY            TAG                 IMAGE ID            CREATED             SIZE
erkules/galera        latest              7e6a8165634a        3 years ago         746MB
erkules/galera        mysql_5.6.35        7e6a8165634a        3 years ago         746MB

运行三个容器模拟MySQL服务器集群

[root@centos32 ~]# docker run -p 33061:3306 --detach=true --name node1 -h node1 erkules/galera --wsrep-cluster-name=local-test --wsrep-cluster-address=gcomm://
95b33969a4ad24976c414fb3c96559aa574884a177d7c107b2fbfc7241f9cd15
[root@centos32 ~]#


[root@centos32 ~]# docker run -p 33062:3306 --detach=true --name node2 -h node2 --link node1:node1 erkules/galera --wsrep-cluster-name=local-test --wsrep-cluster-address=gcomm://node1
d8d103f2cd8485dbbab6e3e161e37e142a47f114413408a51b0c1628979551d0
[root@centos32 ~]#
[root@centos32 ~]#
[root@centos32 ~]# docker run -p 33063:3306 --detach=true --name node3 -h node3 --link node1:node1 erkules/galera --wsrep-cluster-name=local-test --wsrep-cluster-address=gcomm://node1
af3598ed7276cd99746877013d872525f5521ce066c98682b2dc8af0369f9d91
[root@centos32 ~]#
[root@centos32 ~]#
[root@centos32 ~]#
[root@centos32 ~]# docker ps
CONTAINER ID        IMAGE               COMMAND                  CREATED             STATUS              PORTS                     NAMES
af3598ed7276        erkules/galera      "/entrypoint.sh --ws…"   5 seconds ago       Up 4 seconds        0.0.0.0:33063->3306/tcp   node3
d8d103f2cd84        erkules/galera      "/entrypoint.sh --ws…"   27 seconds ago      Up 26 seconds       0.0.0.0:33062->3306/tcp   node2
95b33969a4ad        erkules/galera      "/entrypoint.sh --ws…"   53 seconds ago      Up 52 seconds       0.0.0.0:33061->3306/tcp   node1
[root@centos32 ~]#
[root@centos32 ~]#
[root@centos32 ~]# docker exec -ti node1 mysql -e 'show status like "wsrep_cluster_size"'
+--------------------+-------+
| Variable_name      | Value |
+--------------------+-------+
| wsrep_cluster_size | 3     |
+--------------------+-------+
[root@centos32 ~]#
[root@centos32 ~]#
[root@centos32 ~]#
[root@centos32 ~]# docker exec -ti node1 mysql -e "GRANT ALL PRIVILEGES ON *.* TO 'nginx'@'172.17.0.1' IDENTIFIED BY 'plus'"
[root@centos32 ~]#
[root@centos32 ~]#
[root@centos32 ~]# yum install -y mariadb.x86_64 mariadb-libs.x86_64
已加载插件:fastestmirror
Loading mirror speeds from cached hostfile
 * base: mirrors.163.com
 * centos-sclo-rh: mirrors.163.com
 * centos-sclo-sclo: mirrors.163.com
 * epel: mirrors.tuna.tsinghua.edu.cn
 * extras: mirrors.huaweicloud.com
 * updates: mirrors.tuna.tsinghua.edu.cn
软件包 1:mariadb-libs-5.5.68-1.el7.x86_64 已安装并且是最新版本
正在解决依赖关系
[root@centos32 ~]#
3 配置nginx 负载mysql
// configure nginx for mysql cluster lb

[root@centos32 ~]#
[root@centos32 ~]# cat /etc/nginx/nginx.conf

user  nginx;
worker_processes  auto;


load_module modules/ngx_http_js_module.so;
load_module modules/ngx_stream_js_module.so;

error_log  /var/log/nginx/error.log notice;
pid        /var/run/nginx.pid;


events {
    worker_connections  1024;
}

http {
    include       /etc/nginx/mime.types;
    default_type  application/octet-stream;

    log_format  main  '$remote_addr - $remote_user [$time_local] "$request" '
                      '$status $body_bytes_sent "$http_referer" '
                      '"$http_user_agent" "$http_x_forwarded_for"';

    access_log  /var/log/nginx/access.log  main;

    sendfile        on;
    #tcp_nopush     on;

    keepalive_timeout  65;

    #gzip  on;

    include /etc/nginx/conf.d/*.conf;
}


# TCP/UDP proxy and load balancing block
#
stream {
    # Example configuration for TCP load balancing

    #upstream stream_backend {
    #    zone tcp_servers 64k;
    #    server backend1.example.com:12345;
    #    server backend2.example.com:12345;
    #}

    #server {
    #    listen 12345;
    #    status_zone tcp_server;
    #    proxy_pass stream_backend;
    #}
    upstream galera_cluster {
        server 127.0.0.1:33061; # node1
        server 127.0.0.1:33062; # node2
        server 127.0.0.1:33063; # node3
        zone tcp_mem 64k;
        least_conn;
    }

    log_format mysql '$remote_addr [$time_local] $protocol $status $bytes_received '
                 '$bytes_sent $upstream_addr $upstream_connect_time '
                 '$upstream_first_byte_time $upstream_session_time $session_time';

    server {
        listen 3306; # MySQL default
        proxy_pass galera_cluster;
        proxy_timeout 2s;
        health_check interval=10 fails=1 passes=2;
        error_log  /var/log/nginx/galera_error.log info;
        access_log /var/log/nginx/galera_access.log mysql;
    }
}
[root@centos32 ~]#
[root@centos32 ~]#
[root@centos32 ~]# echo "SHOW VARIABLES WHERE Variable_name = 'hostname'" | mysql --protocol=tcp --user=nginx --password=plus -N 2> /dev/null
hostname node1
[root@centos32 ~]#
[root@centos32 ~]#
[root@centos32 ~]# echo "SHOW VARIABLES WHERE Variable_name = 'hostname'" | mysql --protocol=tcp --user=nginx --password=plus -N 2> /dev/null
hostname node2
[root@centos32 ~]#
[root@centos32 ~]# echo "SHOW VARIABLES WHERE Variable_name = 'hostname'" | mysql --protocol=tcp --user=nginx --password=plus -N 2> /dev/null
hostname node3
[root@centos32 ~]#
[root@centos32 ~]#
[root@centos32 ~]#
[root@centos32 ~]# !!;!!;!!
echo "SHOW VARIABLES WHERE Variable_name = 'hostname'" | mysql --protocol=tcp --user=nginx --password=plus -N 2> /dev/null;echo "SHOW VARIABLES WHERE Variable_name = 'hostname'" | mysql --protocol=tcp --user=nginx --password=plus -N 2> /dev/null;echo "SHOW VARIABLES WHERE Variable_name = 'hostname'" | mysql --protocol=tcp --user=nginx --password=plus -N 2> /dev/null
hostname node1
hostname node2
hostname node3
[root@centos32 ~]#
[root@centos32 ~]#
[root@centos32 ~]# docker exec -ti node1 bash
root@node1:/#
root@node1:/#
root@node1:/# cat /etc/mysql/
conf.d/       debian-start  debian.cnf    my.cnf
root@node1:/# cat /etc/mysql/my.cnf
[mysqld]
user                              = mysql
bind-address                      = 0.0.0.0
wsrep_provider                    = /usr/lib/galera/libgalera_smm.so
wsrep_sst_method                  = rsync
default_storage_engine            = innodb
binlog_format                     = row
innodb_autoinc_lock_mode          = 2
innodb_flush_log_at_trx_commit    = 0
query_cache_size                  = 0
query_cache_type                  = 0
skip_name_resolve


root@node1:/# exit
exit
[root@centos32 ~]#
[root@centos32 ~]#


[root@centos32 nginx]#
[root@centos32 nginx]#
[root@centos32 nginx]# tailf /var/log/nginx/galera_access.log


127.0.0.1 [17/Mar/2021:16:38:28 +0800] TCP 200 179 400 127.0.0.1:33061 0.001 0.004 0.008 0.007
127.0.0.1 [17/Mar/2021:16:38:29 +0800] TCP 200 179 400 127.0.0.1:33062 0.000 0.003 0.008 0.007
127.0.0.1 [17/Mar/2021:16:38:30 +0800] TCP 200 179 400 127.0.0.1:33063 0.000 0.004 0.007 0.007
127.0.0.1 [17/Mar/2021:16:38:31 +0800] TCP 200 179 400 127.0.0.1:33061 0.000 0.004 0.008 0.008
127.0.0.1 [17/Mar/2021:16:38:31 +0800] TCP 200 179 400 127.0.0.1:33062 0.000 0.004 0.007 0.007
127.0.0.1 [17/Mar/2021:16:38:32 +0800] TCP 200 179 400 127.0.0.1:33063 0.000 0.004 0.007 0.007
127.0.0.1 [17/Mar/2021:16:38:32 +0800] TCP 200 179 400 127.0.0.1:33061 0.000 0.003 0.006 0.006


[root@centos32 ~]#
4 关于读写分离
如果应用层支持读写分离,则可以配置2个服务分别用于读写。
[root@centos32 ~]#
[root@centos32 ~]# cat /etc/nginx/nginx.conf

user  nginx;
worker_processes  auto;


load_module modules/ngx_http_js_module.so;
load_module modules/ngx_stream_js_module.so;

error_log  /var/log/nginx/error.log notice;
pid        /var/run/nginx.pid;


events {
    worker_connections  1024;
}

http {
    include       /etc/nginx/mime.types;
    default_type  application/octet-stream;

    log_format  main  '$remote_addr - $remote_user [$time_local] "$request" '
                      '$status $body_bytes_sent "$http_referer" '
                      '"$http_user_agent" "$http_x_forwarded_for"';

    access_log  /var/log/nginx/access.log  main;

    sendfile        on;
    #tcp_nopush     on;

    keepalive_timeout  65;

    #gzip  on;

    include /etc/nginx/conf.d/*.conf;
}


# TCP/UDP proxy and load balancing block
#
stream {
    # Example configuration for TCP load balancing

    #upstream stream_backend {
    #    zone tcp_servers 64k;
    #    server backend1.example.com:12345;
    #    server backend2.example.com:12345;
    #}

    #server {
    #    listen 12345;
    #    status_zone tcp_server;
    #    proxy_pass stream_backend;
    #}
    upstream galera_cluster {
        server 127.0.0.1:33061; # node1
        server 127.0.0.1:33062; # node2
        server 127.0.0.1:33063; # node3
        zone tcp_mem 64k;
        least_conn;
    }

    upstream galera_read {
        #zone is necessary for health checks later
        zone backend 64k;
        server 127.0.0.1:33061; # node1
        server 127.0.0.1:33062; # node2
        server 127.0.0.1:33063; # node3
    }

    upstream galera_write {
        zone backend;
        server 127.0.0.1:33061; # node1
        server 127.0.0.1:33062 backup; # node2
        server 127.0.0.1:33063 down; # node3
    }

    log_format mysql '$remote_addr [$time_local] $protocol $status $bytes_received '
                 '$bytes_sent $upstream_addr $upstream_connect_time '
                 '$upstream_first_byte_time $upstream_session_time $session_time';

    server {
        listen 3310;
        status_zone tcp_server;
        proxy_pass galera_read;
        proxy_connect_timeout 1s;
    }

    server {
        listen 3309;
        status_zone tcp_server;
        proxy_pass galera_write;
        proxy_connect_timeout 1s;
    }

    server {
        listen 3306; # MySQL default
        proxy_pass galera_cluster;
        proxy_timeout 2s;
        health_check interval=10 fails=1 passes=2;
        error_log  /var/log/nginx/galera_error.log info;
        access_log /var/log/nginx/galera_access.log mysql;
    }
}
[root@centos32 ~]#
[root@centos32 ~]#
[root@centos32 ~]# cat /etc/nginx/conf.d/default.conf
server {
    listen       80 default_server;
    server_name  localhost;

    #charset koi8-r;
    #access_log  /var/log/nginx/host.access.log  main;

    location / {
        root   /usr/share/nginx/html;
        index  index.html index.htm;
    }

    #error_page  404              /404.html;

    # redirect server error pages to the static page /50x.html
    #
    error_page   500 502 503 504  /50x.html;
    location = /50x.html {
        root   /usr/share/nginx/html;
    }

    # proxy the PHP scripts to Apache listening on 127.0.0.1:80
    #
    #location ~ \.php$ {
    #    proxy_pass   http://127.0.0.1;
    #}

    # pass the PHP scripts to FastCGI server listening on 127.0.0.1:9000
    #
    #location ~ \.php$ {
    #    root           html;
    #    fastcgi_pass   127.0.0.1:9000;
    #    fastcgi_index  index.php;
    #    fastcgi_param  SCRIPT_FILENAME  /scripts$fastcgi_script_name;
    #    include        fastcgi_params;
    #}

    # deny access to .htaccess files, if Apache's document root
    # concurs with nginx's one
    #
    #location ~ /\.ht {
    #    deny  all;
    #}

    # enable /api/ location with appropriate access control in order
    # to make use of NGINX Plus API
    #
    location /api/ {
        api write=on;
        allow 127.0.0.1;
        allow 10.1.0.0/16;
        deny all;
    }

    # enable NGINX Plus Dashboard; requires /api/ location to be
    # enabled and appropriate access control for remote access
    #
    location = /dashboard.html {
        root /usr/share/nginx/html;
    }
}
[root@centos32 ~]#
[root@centos32 ~]#
[root@centos32 ~]#
[root@centos32 codership-images]#
[root@centos32 codership-images]# netstat -nlp | grep nginx
tcp        0      0 0.0.0.0:3306            0.0.0.0:*               LISTEN      1332/nginx: master
tcp        0      0 0.0.0.0:3309            0.0.0.0:*               LISTEN      1332/nginx: master
tcp        0      0 0.0.0.0:3310            0.0.0.0:*               LISTEN      1332/nginx: master
tcp        0      0 0.0.0.0:80              0.0.0.0:*               LISTEN      1332/nginx: master
[root@centos32 codership-images]#
[root@centos32 codership-images]#
[root@centos32 codership-images]#

// 访问写 pool

[root@centos32 codership-images]#
[root@centos32 codership-images]# echo "SHOW VARIABLES WHERE Variable_name = 'hostname'" | mysql --protocol=tcp -P 3309 --user=nginx --password=plus -N 2> /dev/null
hostname node1
[root@centos32 codership-images]#
[root@centos32 codership-images]#
[root@centos32 codership-images]# echo "SHOW VARIABLES WHERE Variable_name = 'hostname'" | mysql --protocol=tcp -P 3309 --user=nginx --password=plus -N 2> /dev/null
hostname node1
[root@centos32 codership-images]#
[root@centos32 codership-images]#
[root@centos32 codership-images]# echo "SHOW VARIABLES WHERE Variable_name = 'hostname'" | mysql --protocol=tcp -P 3309 --user=nginx --password=plus -N 2> /dev/null
hostname node1
[root@centos32 codership-images]#

// 访问读 pool

[root@centos32 codership-images]#
[root@centos32 codership-images]# echo "SHOW VARIABLES WHERE Variable_name = 'hostname'" | mysql --protocol=tcp -P 3310 --user=nginx --password=plus -N 2> /dev/null
hostname node1
[root@centos32 codership-images]# echo "SHOW VARIABLES WHERE Variable_name = 'hostname'" | mysql --protocol=tcp -P 3310 --user=nginx --password=plus -N 2> /dev/null
hostname node2
[root@centos32 codership-images]# echo "SHOW VARIABLES WHERE Variable_name = 'hostname'" | mysql --protocol=tcp -P 3310 --user=nginx --password=plus -N 2> /dev/null
hostname node3
[root@centos32 codership-images]#
[root@centos32 codership-images]#
5 关于健康探测的考虑
在生产环境中,您需要一种将数据库响应解析为有意义的内容的方法,以便更充分地利用NGINX的健康检查功能。这通常是通过在数据库服务器上的开放端口上运行一个进程来完成的,该进程检查数据库的运行状况,并用数据库的状态响应来自NGINX Plus的HTTP请求。您可以编写自己的脚本,在运行状况请求ping时运行简单的SELECT查询(或选择的任何数据库运行状况检查),也可以使用现有的运行状况检查脚本(https://github.com/nginxinc/NGINX-Demos/blob/master/mysql-galera-demo/mysql_backend/mysqlchk ),该脚本在数据库节点上执行简单的show databases查询。
对于测试集群,我们可以从GitHub安装了链接的健康检查脚本,并将其设置为在端口9200(其默认端口)上运行的服务。由于脚本使用HTTP来响应ping的健康检查,因此我们通过在节点健康时检查HTTP响应的头部以及在节点关闭时再次检查HTTP响应的头部来确认它是否正常工作(我们只显示了curl输出的第一行,以及状态代码):
user@dbnode-03:# curl -i http://localhost:9200
HTTP/1.1 200 OK
     ...

user@dbnode-03:# sudo service mysql stop
 * Stopping MariaDB database server mysqld                    [ OK ]

user@dbnode-03:# curl -i http://localhost:9200
HTTP/1.1 503 Service Unavailable
...最后将nginxplus设置为使用端口9200进行应用程序健康检查。只需将port参数添加到服务器块中的health_check指令:
stream {
    upstream galera {
        # ...
    }

    server {
        listen 3306;
        proxy_pass galera;
        proxy_connect_timeout 1s;
        health_check port=9200;
    }
}
6 参考文档
MySQL High Availability with NGINX Plus and Galera Clusterhttps://www.nginx.com/blog/mysql-high-availability-with-nginx-plus-and-galera-cluster/
Advanced MySQL Load Balancing with NGINX Plushttps://www.nginx.com/blog/advanced-mysql-load-balancing-with-nginx-plus/
Scaling MySQL with TCP Load Balancing and Galera Clusterhttps://www.nginx.com/blog/scaling-mysql-tcp-load-balancing-nginx-plus-galera-cluster/


按点赞数排序
按时间排序


 点赞 1
点赞 1 浏览 1.3k点赞 0浏览 1.9k点赞 2浏览 1.5k
 微信公众号
微信公众号 加入微信群
加入微信群

